 |
||||||||||||||||||||||||||||||||||||||||||||||||||||||||||||||||||||
|
If you have trouble viewing this newsletter, click here. Welcome again to our monthly newsletter with features on exciting celestial events, product reviews, tips & tricks, and a monthly sky calendar. We hope you enjoy it!
Astronauts on board the International Space Station (ISS) unfurled a new pair of solar energy panels that sprout out of the end of a new 17.5-ton truss section, which was brought up by the space shuttle Atlantis. They are the largest solar panels ever taken to space; fully unfolded, they reach a length of 240 feet (73 meters). They are designed to double the ISS’s capability to generate power from sunlight when they go online during a future shuttle mission. The panels are made of layers of thin gold Mylar plastic, which are highly reflective.
How bright? Like other satellites, the ISS shines by virtue of sunlight reflected off of its metallic skin. The station orbits approximately 213 miles (341 kilometers) above Earth. Before the ISS spread its new pair of gold wings, it was already the brightest of all space vehicles, at times appearing to shine with a brilliance equal to the planet Jupiter. Now skywatchers should notice the orbiting outpost glowing with an even greater luster. Nobody knows exactly how much brighter it will be, but there’s a good chance that it could be brighter than magnitude -3, approaching the glow of Venus, the brightest planet. On this astronomers' scale, smaller numbers denote brighter objects, and negative numbers are reserved for the handful of the very brightest. And the ISS will likely get even brighter. The solar panels are only the second of four planned arrays that will be deployed between now and before the shuttle fleet is retired in the year 2010. When to look Skywatchers across much of North America will have opportunities to see the ISS in the coming weeks. To the unaided eye, it appears as a large “star” with a yellowish-white tint that moves with a steady speed across the sky. Beginning late next week and running through the first two weeks of October, early risers will be able to look for the station in the dawn twilight if skies are clear. Starting in mid-October, it will make passes during convenient evening hours, soon after sundown.. How to Find the International Space Station Starry Night® users, with the latest orbital data and their home location set correctly, are at a distinct advantage for planning their ISS observations. Here's how...
Determining Visibility of the ISS There are three good ways to determine when the ISS will be visible in the upcoming days.
Tips for accurate plotting of the ISS To ensure your predications are accurate, follow these tips.
Traveling to the ISS You’re not stuck on the Earth with Starry Night®. Why not take a trip to the ISS and look back at your home location from space!
Joe Rao, SPACE.com Skywatching Columnist and Pedro Braganca, Content Director, Starry Night® contributed to this article.
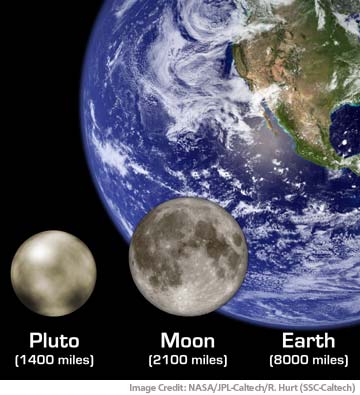
On August 24, 2006, the International Astronomical Union (IAU) demoted Pluto to the new category of “dwarf planet”. To add insult to injury, the Minor Planet Center gave Pluto a number – 134340 – just like any lowly asteroid. But before we get too emotional, let’s consider the following: In the beginning there were seven planets: the Sun, the Moon, Mercury, Venus, Mars, Jupiter and Saturn. Then, in 1543, Copernicus upset the apple cart and promoted the Sun to a special position. The Moon, however, became a mere satellite of the “new” planet Earth. Alas, poor Moon! So now, we had six planets. Herschel’s discovery of Uranus in 1741 made it seven and Piazzi’s discovery of Ceres in 1801 gave us a total of eight planets. Admittedly, Ceres seemed to be extremely small but it fit nicely into the empty gap between Mars and Jupiter. But then the floodgates opened. By the mid-nineteenth century, fourteen more very small “planets” were discovered in addition to huge Neptune. This was too much for astronomers. Neptune was far beyond the orbit of Uranus and similar in size but what about all those smaller objects? They all shared the space between Mars and Jupiter and more were sure to be discovered. Thus in 1852, Ceres and her fourteen siblings were demoted to “asteroids”. Alas, poor Ceres (and 14 others)! The solar system had now shrunk from 23 to 8 planets. Some astronomers, however, thought there were irregularities in the motions of Uranus and Neptune that could be caused by another large planet even further away. The search began and Clyde Tombaugh found Pluto in 1930. And now there were nine planets. Unfortunately, Pluto turned out to be much too small to cause the calculated anomalies. The search continued for a tenth planet but to no avail. Measurements made by the Voyager spacecraft cast doubts on the original calculations and apparently no large planet is required to account for the motions of Uranus and Neptune. It seems that Pluto acquired the title of planet by false pretenses!
From the beginning, it was suspected that Pluto was an oddball. Its orbit is inclined at 17 degrees to the ecliptic; most of the rest of the planets have inclinations of less than 4 degrees. (Mercury’s inclination is 7 degrees). Pluto is a small, rocky world; the other outer planets are gas giants. And Pluto is the only “planet” that crosses another planet’s orbit. At certain points in its 250-year trip around the Sun, Pluto is closer to the Sun than Neptune. It was long suspected that there were other worlds out in the depths of space dubbed the Kuiper Belt. And indeed, modern techniques allowed us to bag a number of these denizens of deep space. Some of these Kuiper Belt objects (KBO’s) were a good fraction of Pluto’s size and in 2003 the inevitable happened. Object 2003 UB313 turned out to be bigger than Pluto. Yet Pluto was still called a planet. It seemed only fair that UB313, nicknamed “Xena”, should also be a planet. And what about some of the other KBO’s? How big did an object have to be to be called a planet? It was 1852 all over again. After several proposals, the IAU has now finally settled on the definition of a planet and Pluto didn’t make it. But being a dwarf planet isn’t so bad, especially for an impostor! Ceres, too, is now a dwarf planet after 150 years in servitude as an asteroid. And UB313? Our Xena is now officially 136199 Eris, another dwarf planet. Alas, poor Xena! Herb Koller, Co-author of Starry Night Middle School and High School and retired astronomy teacher
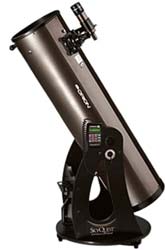
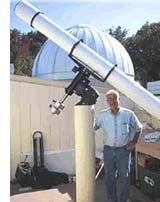
My new Orion XT10 arrived in three boxes, the biggest of which would only barely fit into my Toyota Echo hatchback. I had been anticipating the arrival of my scope for a couple of days and was delighted to have received it. As I negotiated the stairs up to my front door with the largest of the packages, I couldn't help but consider that I was responsible for the impending downpour. It is widely accepted that I am the "Anti-Handyman" with only minimal assembly skills. My wife Gwen usually makes herself scarce whenever I take on projects with screwdrivers and drills, out of concern for her delicate sensibilities and her respect of the fact that I have to win in the battle against the bad thing that is fighting me. Yes, the difficulty level of my attempted projects is usually measured in curse words. These days, with a nine year old in the house, the curse words have been replaced with the Flintstones equivalents such as "Frazamazta","Dookentoble" and "Krazellbatz". The hardest projects get a five "Frazamazta" rating. Luckily, the good folks at Orion Telescopes have a decent set of instructions to follow and, being a long weekend, I took my time. Only an hour went by before I had a telescope. This evening, a hole opened in the clouds. I hurried down the steps as best I could carrying a huge telescope tube almost as big as myself. Within a couple of minutes I was good to go. What would be my first object? My skies were blocked except for mostly overhead. I opted for a famous double star called Albireo. As I swung the tube around I relished the thought of the ten inch mirror catching the light of the beautiful pair of stars - one blue and one orange... ...I'm still looking forward to seeing them, once the clouds part. Maybe I'll be lucky on Thursday. Steve Bevan Reprinted courtesy yorkregion.com. |
October 2006
|
|||||||||||||||||||||||||||||||||||||||||||||||||||||||||||||||||||
|
With pleasant autumn evenings arriving, many people may be thinking of buying a telescope. There’s a lot of bad advice out there; here are some samples, counterbalanced with the facts. Myth: Magnification is a good way to judge a telescope
The best way to compare telescopes is by their aperture. By and large, a telescope with a larger aperture will outperform a telescope with a smaller aperture on every kind of object. The main counterbalancing factors are size, weight and cost. If a telescope is too large to be set up conveniently, it won’t be used as often as a smaller, more convenient scope.
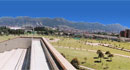
Myth: Smaller apertures show more than larger ones when the seeing is poor Reality: On many occasions I’ve masked my telescopes down under marginal seeing conditions in the hopes of improving their image, but never have I noticed any improvement. All it does is make the image dimmer and reduce the amount of detail visible. Myth: Smaller apertures work better than large ones under light polluted skies Reality: I lived for many years in a big city, and never once was I tempted to use anything other than my largest telescope for all kinds of observing. If light pollution reduces what your naked eye sees by three magnitudes, it will also reduce what your telescope sees by exactly the same amount, three magnitudes. Myth: Faster scopes are better at showing faint objects than slower scopes Reality: This myth comes from people who are knowledgeable about photography, where “faster” lenses gather more light than “slower” lenses. In telescopes used visually, the focal ratio is irrelevant in terms of how bright the image will appear at a given magnification. Short focal ratios (f/4 to f/6) are generally preferred because they make the scope more compact and allow a wider field of view, while long focal ratios (f/8 to f/15) are preferred because they provide higher magnifications with relatively simple and inexpensive eyepieces. Objects are equally bright in either scope, given identical magnifications. Myth: I don’t want a Dobsonian: it doesn’t look like a real telescope Reality: Despite the fact that the Dobsonian design offers the most “bang for the buck” in any telescope size, some people seem to be turned off by its looks. It doesn’t have a lens at the top of the tube, and the mount looks more like a cannon than a precision instrument. But, take a look at any modern research telescope, such as the Subaru on Mauna Kea:
That sure looks more like my Dob than like my grandfather’s refractor! Geoff Gaherty |
|
|||||||||||||||||||||||||||||||||||||||||||||||||||||||||||||||||||
|
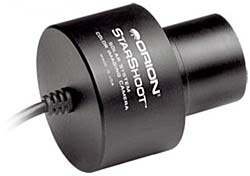
I’m a visual astronomer. I’ve tried astrophotography a few times, but have never been very happy with the results or willing to put in the time and money necessary to improve them. I’ve pretty much come to think of astrophotography as the rich man’s end of the hobby. But the appearance of relatively inexpensive (under $100) devices for acquiring images of solar system objects recently attracted my attention, and made me decide to give it another try.
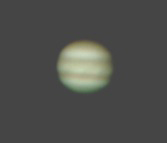
Jupiter was the only suitable target during the period I borrowed the laptop. I mounted the camera on my Starmaster 11” Newtonian. At first I tried using the camera at prime focus (1200mm focal length), but found the image of Jupiter way too small. I added a TeleVue 2.5x Powermate, which gave me a larger image scale (3000mm focal length), but even this was barely enough. Unlike a normal camera, there are no controls on the StarShoot: it is entirely controlled by software, in this case MaxIm DL™ Essentials. My first night out, I experimented with various settings, but managed to grossly overexpose every image. The manuals provided by Orion are excellent although, in this case, I would have liked if the sections of the manual describing the operation of the software were clearer. The second night, I had read the manual more carefully and managed proper exposures. The standard technique today for planetary imaging is to make a large number of individual exposures, and then later combine them (a process called “stacking”) in software. There are two ways of exposing image sequences with this camera. One is to take an automated rapid series of images, stored one at a time; the other to actually shoot a video, which is stored as a single file, but which can be broken out in the provided software into individual frames for stacking. I found the second method the easiest to use and work with. The trickiest part of image acquisition was getting the focus right. The software presents a series of live images from the camera, and you have to focus with a slight time delay between what you see and what you get. There is a method of computer assisted focusing, but I didn’t get into that. One thing that rapidly became apparent is the need for lots of hard drive space. In each of my three sessions I spent about five minutes each acquiring images, and ended up with about 500 MB of data each night! The next day, I experimented with the MaxIm DL Essentials software, and learned how to stack images. I then transferred the images to my Macintosh, and did a bit of touching up with Preview, the simple graphics program provided free with every Mac. Here’s my result from night two, 2006 July 19 01:36UT:
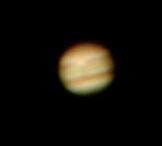
As with most planetary images, south is at the top here. There are two white ovals clearly visible in the northern part of the Equatorial Zone (bright band close to equator) with several dark projections visible along the south edge of the North Equatorial Belt (dark belt just below equator). The next night, the Great Red Spot was on Jupiter’s central meridian. I again shot a variety of exposures and then combined them into the following image, 2006 July 20 01:35UT:
The Red Spot Hollow is clearly visible in the southern edge of the South Equatorial Belt, along with a hint of the thin streak enclosing the Spot itself. The Spot shows no color in this image. Some other details visible in this image are the thin line of the Equatorial Band, a narrow belt which lies right on Jupiter’s equator, and a dark shading across the whole of the Equatorial Zone, which was readily visible at the eyepiece. The brownish red color of the belts also shows up well in this image. While these results are far from the high resolution images widely published by experienced planetary imagers on the internet, they are very pleasing to me, as they show much more than I had any reason to expect in only a few sessions. With a larger image scale, more careful focusing, and more experience stacking and manipulating images, I feel I could vastly improve the quality of these images. The camera itself and the software that accompanies it are more than adequate for such a task. Geoff Gaherty |
An unbeatable introductory package for astrophography!
The top-of-the-line image processing and analysis software. |
|||||||||||||||||||||||||||||||||||||||||||||||||||||||||||||||||||
|
Digital Institute 06 The second annual Digital Institute was hosted by Spitz Inc. in historic Chadds Ford, PA. During the expanded five day Institute, participants explored astronomy education, presentation and production techniques using Starry Night® and other digital tools. Courses covered a broad range of digital planetarium topics from basic techniques and terminology, to advanced lesson creation with 3D simulation software, to advanced-user sessions.
The nearly 30 attendees of the Digital Institute focused on using software to enhance education in both the classroom and the planetarium. To set up a Starry Night® Training Day for your school district, please contact Mike Goodman at <mgoodman@imaginova.com>.
Starfest 2006 Starfest is Canada's largest annual observing convention and star party. It attracts over nine hundred astronomy enthusiasts from Ontario, and neighboring provinces and states. It has been ranked among the top seven star parties in North America by Sky and Telescope magazine.
Starry Night®'s Pedro Braganca and Herb Koller presented an “Observing with Starry Night®” hands-on workshop to 26 registered workshop participants. The following day, Herb Koller introduced educators to Starry Night® Middle School and Starry Night® High School products. Visit Starry Night® as we hit the road this fall and make stops at these conferences:
Pedro Braganca, Content Director, Starry Night® contributed to this article. |
|
|||||||||||||||||||||||||||||||||||||||||||||||||||||||||||||||||||
|
Triangulum is well placed at this time of year for observations of M33, a spiral galaxy. However, at 2.4 million light years and only 5% as massive as our own galaxy, it's a dim fuzzy object in 8" scopes and requires good dark skies to show any detail. Follow a line from M33 through Mirach in Andromeda to find the brightest spiral in the sky, M31, the Andromeda Galaxy as well as its satellite galaxies M32 and M110. As with M33, the photons from M31 have travelled 2.4 million years to pass through the pupil of your eye and end their journey on your retina. The Andromeda Galaxy is also one of the few galaxies that's blue-shifted, meaning that is traveling toward us: almost all others are red-shifted and speeding away. Once you've found M31 with the aided eye, you can practice picking it out with the naked eye. You can then congratulate yourself that no-one can see any farther than you–the barely visible faint smudge you can just make out is the farthest object visible to the unaided eye. At the tip of the constellation's brightest limb, is Almach (Gamma Andromedae) a very sweet orange/blue double. And finally, below Triangulum, in Aries, is Mesarthim (Gamma Aries) another lovely double, orange/green, sitting 207 light years away with an angular separation of 7.5". Sean O'Dwyer
|
|
|||||||||||||||||||||||||||||||||||||||||||||||||||||||||||||||||||
|
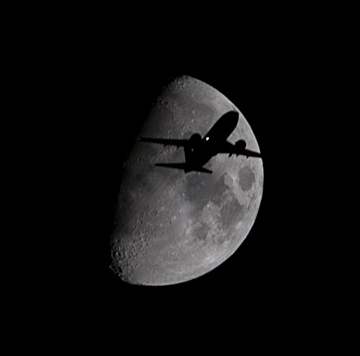
David Wellwood used his Canon EOS 20D digital camera to capture an aircraft passing in front of the Moon. Focal Length: 280mm - Shutter Settings: 1/200 sec, f/5.6. David writes: Good photos of aircraft in front of the moon at night are hard to get. I took this one by waiting until the moon was in the ‘Big Sur Two’ arrival pattern into SFO airport to improve my chances, then watching patiently until I got lucky. You can see the distortions caused by the hot engine exhaust. PHOTO OF THE MONTH COMPETITION: We would like to invite all Starry Night® users to send their quality astronomy photographs to be considered for use in our monthly newsletter. Featured submissions (best of month) will receive a prize of $25 USD. Please read the following guidelines and see the submission e-mail address below.
|
|
|||||||||||||||||||||||||||||||||||||||||||||||||||||||||||||||||||
 |
||||||||||||||||||||||||||||||||||||||||||||||||||||||||||||||||||||
|
*Save $20 off Version 6 Upgrades! To redeem your $20 instant savings on your Starry Night® Enthusiast version 6 upgrade, Pro version 6 upgrade, Pro Plus version 6 upgrade or AstroPhoto Suite (2006 edition) upgrade, you must enter coupon code sn20v6 in the coupon code field of the Starry Night® shopping cart (the coupon code field appears on the Payment Page of the shopping cart. ) The discounted price will only appear in the Starry Night® shopping cart but not on the product detail page. Minimum purchase of $45.00 USD is required. Offer expires September 30, 2006 11:59 pm EST. Not valid on previous purchases. |
||||||||||||||||||||||||||||||||||||||||||||||||||||||||||||||||||||


 Reality: Like many myths, there’s a kernel of truth in this one. For a given aperture, a refractor, with its unobstructed aperture, will have better contrast than a reflector, because of the scattering of light caused by having a secondary mirror in the light path. However, this breaks down when faced with the realities of economics and mechanics. An 8” reflector or Schmidt-Cassegrain costs $360 to $2100 and weighs 40 to 75 pounds, complete, and is easily transported in a small car. An 8” refractor costs at least $3500 for the optical tube alone. The tube is eight feet long and would weigh 40 pounds, requiring a mount that costs at least as much as the tube and a permanent observatory to house it in.
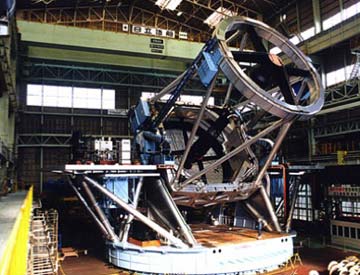


You have received this e-mail as a trial user of Starry Night® Digital Download
or as a registrant at starrynight.com. To unsubscribe, click here.