Location


One of the most important factors that determines what you will see in any given sky is the location that you are viewing from. In this section we'll discuss how to adjust your location and how that location determines what you will see. We will show you how to use Starry Night to travel around the Earth and around the Solar System.

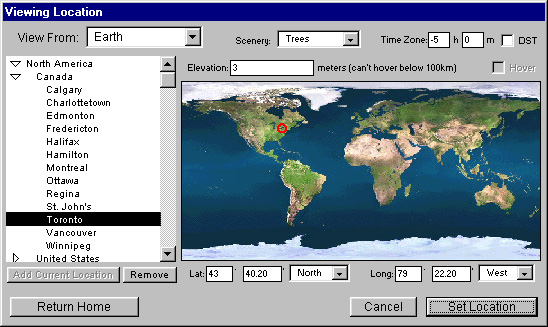
Where am I?

Starry Night displays your current location beside the location flag at the bottom left of all open windows. In this example, you're located on Earth.

The Tool Palette also displays your current location. In this case, your location is Toronto, latitude 43° north, and longitude 79° west.


Changing your location

To change your current location, press the Location button in the Tool Palette or select Viewing Location from the Settings menu. This will bring up the Location window shown below.

Set Viewing Location


The Viewing Location Window

To quickly change your viewing location, click on the world map at the spot you wish to go to. A small red location circle will then appear at your new choice. When you press the Set Location button, the window will close, and you will be viewing from your new location. Alternatively, you can select a location from the hierarchical list at the left. To show locations within a category, click the triangle beside the category's name. For example, to view the sky as it appears from Paris, France, click the triangle beside Europe to show a list of countries within Europe. Click on the triangle button beside France to show cities in France, then click Paris. Notice that the red circle indicating your viewing location is now over Paris on the world map.

You may also enter a new latitude and longitude directly, by using the data boxes below the world map. In addition, you can also enter new elevation information by using the Elevation data box located above the map.

Adding Additional Locations

You may add your new locations to the hierarchical list. To do this, open the location window, expand the category your new location will be listed under (using the little triangles), then choose your new location by clicking on the map, or entering the exact latitude and longitude. Enter a new elevation if it is relevant. The Add Current Location button should now be highlighted. When you press it, a dialog box will open, letting you name your new location. After naming it, select OK. Your new location will now be listed in the hierarchical list.

Removing Locations

To remove a location from the list, select the location from the hierarchical list, then press the Remove button. A dialog box will appear to confirm your decision to delete the location. Select the Delete button to remove the location, or cancel the operation.


Viewing from other planets

If you like, you can view the sky from another planet, the moon of another planet, or even from the Sun itself. There are two ways of doing this.

To quickly change your viewing location, select the planet you wish to go to from the Planets Palette, then click the Go There button. Instantly you are transported to that planet, viewing the sky as is would look from that planet.

For more information on the Planet Palette, please see Finding Objects in the Sky.

  • Note: You are transported to the same latitude, longitude and elevation on the new planet as you were on Earth. If you care to adjust exactly where on the new planet you're looking from, set your location by opening up the Location window again. The map will now be that of your new planet.

The second way to change the planet you're viewing from is to use the "View From:" popup menu in the upper left hand corner of the Location window. For example, if you decide you'd like to see the view from Venus, you can select that planet using "View From: Venus". Then, if you care to adjust where on Venus you're looking from, set your exact location using the additional features of the Location window.


Lifting off

Elevation Controls

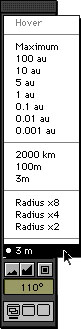
Pressing the Elevation Up button on the Tools Palette will allow you to "lift off" from your current location. You will see the trees drop away beneath you. If it is currently daytime in the view, you will see the atmosphere fade as you rise through it on your way into space. Please note that you are still at your original location but at some distance over it, as if attached by a long, invisible pole. As the Earth rotates, you also will rotate in space, as evidenced by the apparent motion of the sky and stars. To return and "land" at your original location, you can press the Elevation Down button. To avoid rotating with the Earth select Hover (see below).

You can use the Elevation tools on any object (the Sun, planets, moons, or comets), thereby getting some extraordinary views of the solar system.

You can speed up your lift-off or landing by holding down the Shift key as you blast off or re-enter. The rate at which you lift off can also be adjusted by using a slider from the Preferences dialog box.

  • Tip: To immediately lift off to maximum elevation (700 AU's) or to descend to the surface, hold down the Alt key (Windows) or the Command key (Macintosh) as you click the Elevation Up or Down buttons.


Elevation Display Popup

If you hold down your mouse button while the cursor is over the elevation display, a popup menu will appear letting you quickly change your elevation to a number of preset heights, or to hover above your present location. The Radius settings allow you to instantly elevate 2, 4, or 8 times the radius of the planet you are located on. This is handy if you want to quickly get a overall look at the planet you're on.


Hovering

If you are elevated more than 100 km above the surface of the Earth you can "hover" at that location. Hovering allows you to stay at a constant latitude above any object and watch as it rotates beneath your feet (as time passes). To hover, use the Elevation Display popup to select Hover, or open the Location dialog box and click the Hover check box. (It will be dimmed if you are currently beneath 100 km.)

At Sienna Software, hovering is one of our favorite pastimes. Used in combination with the location scroller tool, you are able to achieve fantastic views of the planets and Solar System. For instance, you can hover a few thousand miles off the surface of Saturn, then use the Location Scroller tool to view the rings from every angle. Or hover several AU's off the surface of the Sun, turn on the planet's orbits, and location scroll to view the ecliptic plane. By trying these examples and exploring with others of your own, you will get a real sense of the three-dimensional relationships between the solar system's objects.

  • Note: The point at which you can hover over a planet is determined by the size of the planet. For instance, on a smaller planet like Mars, you can start hovering at a lower elevation (around 50 km), while on a larger planet like Jupiter, you can begin hovering at 1100 km.


Viewing from a Fixed Location

Fixed Location

To change to a fixed location, open the Location dialog box. From the "View From:" popup menu select "Fixed Location". A fixed location is entered as a heliocentric ecliptic Cartesian coordinate. The position on the ecliptic plane is given by the "x" and "y" coordinates. The "z" coordinate takes the location out of the plane of the ecliptic. Heliocentric means that the Sun is the center of the coordinate system, so the point (0,0,0) is at the center of the Sun.

Example: When you switch from a location on Earth to a fixed location, the x, y, and z coordinates will be filled with your current Earth location, and since it's a fixed location, you'll be left behind as the Earth continues on in its orbit.

Fly-bys

There are times when you may wish to watch a celestial event from a fixed point in space. Using the elevation controls to rise up above a planet and then switching to a fixed location provides a mechanism by which you can watch a planet whiz past in its orbit if you set time flowing. If you have risen up from the planet's surface in the direction that it is traveling, you will pass right through it as it moves forward in its orbit.

  • Tip: Noon or midnight is a good time to try fly-bys, since you will be lifting off in a direction that is perpendicular to the direction of the planet's orbit.


| Contents | Previous | Next | Frequently Asked Questions |
Page last modified on: January 25, 1999